Friday, August 24, 2012

Install oracle on Redhat Linux on VM VirtualBox


Steps to Install Oracle 11g on Redhat Linux on a virtual Box.

First of all we have to keep in mind that we need space for installing Oracle Database as when Virtual Box is installed it only creates a 8Gb of virtual Hard Disk by default.

To add another virtual hard drive in VM virtualBox Managaer goto Settings --> Storage --> SATA Controller
Click on the add button create a new virtual hard disk and format it in ext3 or add an pre-formatted  existing virtaul hard disk.
After adding the second virtual hard drive it will look like this pic...


Here I have created 2 Virtual HD's namely redhat_oracle2.vdi and redhat_oracle2_2.vdi.

Now we are going to add this hard drive to linux OS.

Start your Vbox where Redhat Linux is intalled and goto Sytem --> Administrator --> Logical Volume Management.
Click on VolGroup00  physical view
choose option Extend Volume Group a popup will appear and you need to add an unintialized Disk entity
on /dev/sdb/


Click on VolGroup00  Logical view
choose option add Volume Group a popup will appear and you need to add a LV name ( I choose Oracle) and mount point as /u01
Also remember to check mount and mount when rebooted options too otherwise it will not appear through df -h command.


INTERNET CONNECTEVITY

If you have to connect to internet you should setup network setting in Virtual Box.

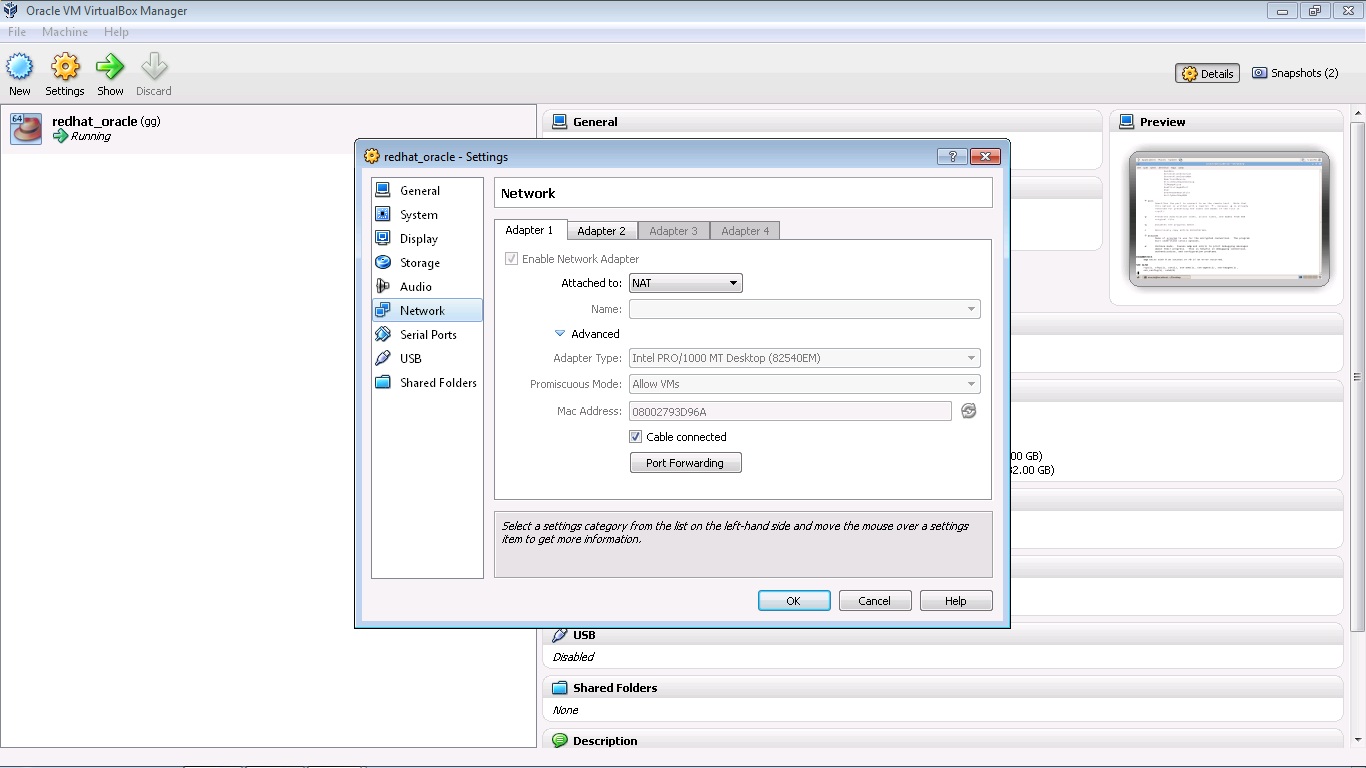
Goto Virtual Box Manager-->   Settings   -->  Netrwork --> Adaptor 1
Enable Netrwork Adaptor Then choose NAT, Adaptor type will intel xxx.
Also choose cable connected even though you have wireless router setup at home.
This will be your setting for eth0 which will help you open google.com.


Now we will setup eth1 to connect to other VM's on your other laprtops.

Goto Virtual Box Manager--> Settings --> Netrwork --> Adaptor 2
Enable Netrwork Adaptor Then choose Bridged Adaptor, Adaptor type will  like wifi bgn or wifi b/g/n.
It is important to choose Promiscuous Mode as Allow VM's.
Also choose cable connected even though you have wireless router setup at home.


Now we are ready to install Oracle.


Pre-Instalation Tasks

1. Create oracle User Account

Login as root and create user oracle which belongs to oinstall group.
su -
# groupadd oinstall
# useradd -g oinstall oracle
#passwd oracle

2. Setting System parameters
Edit the /etc/sysctl.conf and add following lines:
kernel.shmall = 2097152
kernel.shmmax = 2147483648
kernel.shmmni = 4096
kernel.sem = 250 32000 100 128
fs.file-max = 6553600
net.ipv4.ip_local_port_range = 1024 65000
net.core.rmem_default = 4194304
net.core.rmem_max = 4194304
net.core.wmem_default = 262144
net.core.wmem_max = 262144
Note: You need reboot system or execute "sysctl -p" command to apply above settings.
Edit the /etc/pam.d/login file and add following line:
session required pam_limits.so

Now we need to set soft and hard limit for
Number of processes available to a single user(nproc) and Open file descriptors (nofile).
Edit the /etc/security/limits.conf file and add following lines:
oracle soft nproc 2047
oracle hard nproc 16384
oracle soft nofile 1024
oracle hard nofile 65536
You can Check the soft and hard limits for the file descriptor setting
$ ulimit -Sn 
1024
$ ulimit -Hn 
65536
Check the soft and hard limits for the number of processes available to a user by
$ ulimit -Su
2047
$ ulimit -Hu
16384


3. Creating oracle directories
# mkdir -p /u01/app/oracle
# mkdir -p /u01/app/oracle/product
# chown -R oracle:oinstall /u01
#chmod -R 775 /u01


4. Setting Oracle Enviroment
Edit the /home/oracle/.bash_profile file and add following lines:
ORACLE_BASE=/u01/app/oracle
ORACLE_HOME=$ORACLE_BASE/product/112
ORACLE_SID=orcl2
LD_LIBRARY_PATH=$ORACLE_HOME/lib
PATH=$PATH:$ORACLE_HOME/bin

export ORACLE_BASE ORACLE_HOME ORACLE_SID LD_LIBRARY_PATH PATH

Save the .bash_profile and execute following commands for load new enviroment:
cd /home/oracle
. .bash_profile
Installation
Now download oracle 11gR2 database from Oracle.com
Remember to change owner for our /u01 mount point
login as root
#cd /
#chown oracle:oinstall /u01
log back in as oracle
$mkdir database
$unzip linux_11gR2_database_1of2.zip
$unzip linux_11gR2_database_2of2.zip
if there is permission issue log in as root
$su -
password ....
#chmod 777 *.zip

log back in as oracle
$unzip linux_11gR2_database_1of2.zip
$unzip linux_11gR2_database_2of2.zip


$cd database
$./runInstaller
choose your settings as you want.

oops.... I forgot to install linux Packages
Now we have to Find each package and install it from different CD's of Redhat Linux.


OS Kernel Parameter was fixed by choosing the option "Fix & check Again".
Basically it creates a directory in /tmp/CVU_11.2.0.1.0_oracle
we have to login as root and run the filename runfixup.sh given popup.


Packages Install has to be fixed by going to
Apllications--> Add/Remove Software
Search for package by package name  , if it is not installed then install it by searching in all  CD's.
when all packages are installed then choose ignore all and go next.
When done goto sqlplus and check database is OK.
$sqlplus '/as sysdba'
sqlplus> select * from v$database;

Install Oracle Goldengate on Redhat Linux

Steps to Install Oracle Goldengate on Redhat Linux


1. First of all we will need to Install Oracle 11g database on Redhat Linux both on Source side and 
    Receiver side.
Source
2. Insure that sources side database archive log mode
SQL> select log_mode from v$database;

LOG_MODE
------------
NOARCHIVELOG

Put your sources side database archive log mode

SQL> shutdown immediate;
To enable the database in archive log mode following parameters must be set in init.ora file of instance
log_archive_dest_1=’location=/u01/app/oracle/archivelog’
log_archive_dest_state_1=enable
sqlplus '/as sysdba'
SQL> create spfile from pfile;
SQL> startup mount;
SQL> alter database archivelog;
Database altered
SQL> alter database open;
Database altered


3. Download Oracle goldengate 11g for linux from (size 89 Mb)
4. Unzip it and rename the folder to goldengate

5. Set LD_LIBRARY_PATH
 export LD_LIBRARY_PATH=$ORACLE_HOME/lib:/u01/goldengate

6. Create sub directories for goldengate
    $cd /u01/goldengate
    $./ggsci
    $create subdirs


GGSCI (localhost.localdomain) 3> exit
$mkdir discard

Destination
7. Now repeat the same steps on destination side.

Source
8.  Add supplimental logging on the source side.


sql> alter database add supplemental log data;


sql> alter system set recyclebin=off scope=spfile;

create user schema to support replication
sql>create user ggate identified by ggate default tablespace users temporary tablespace temp;
sql>grant connect,resource to ggate;
sql>grant execute on utl_file to ggate;
sql>exit


9. These scripts are necessary for user ggate to be able to support replication.
   i)@marker_setup.sql


ii) @ddl_setup.sql

choose INITIALSETUP as mode of Install


iii) @role_setup.sql
iv) grant GGS_GGSUSER_ROLE to ggate;
v)@ddl_enable.sql


10. Now we will create test schemas to test our replication.

Source Database : ORCL
sql> create user sender identified by sender default tablespace users temporary tablespace temp;
sql> grant connect,resource,unlimited tablespace to sender;


Destination Database : ORCL2
sql> create user receiver identified by receiver default tablespace users temporary tablespace temp;
sql> grant connect,resource,unlimited tablespace to receiver;

11. Lets start replication....


Source Side


$./ggsci


On the command line of goldengate type info all
It will show which processes are configured manager/Extract/Replicat

GGSCI > info all
 it will show manager as stopped

Edit Parameter file of Manager and put ( PORT 7809 ) in the file.
GGSCI >edit params mgr
PORT 7809
save and exit
Now lets start manager


GGSCI >start manager
GGSCI > info all
Now it will show Manager as running

Next step is to configure Extraction process
GGSCI> add extract ext1,tranlog,begin now

Define path for exttrail

GGSCI>add exttrail /u01/goldengate/dirdat/lt,extract ext1


Now edit ext1 parameter file and add following lines into it where 192.168.x.xxx is IP Adrress of your machine

GGSCI>edit params ext1


--extract group--
extract ext1
--connection to database--
userid ggate, password ggate
--hostname and port for trail--
rmthost 192.168.x.xxx, mgrport 7809
--path and name for trail--
rmttrail /u01/goldengate/dirdat/lt
--DDL support
ddl include mapped objname sender.*;
--DML
table sender.*;


Destination Side


create user schema to support replication on destination side also and repeat the following steps on destination side too.

sql>create user ggate identified by ggate default tablespace users temporary tablespace temp;
sql>grant connect,resource to ggate;
sql>grant execute on utl_file to ggate;


SQL> @marker_setup.sql
SQL> @ddl_setup.sql
SQL> @role_setup.sql
SQL> grant GGS_GGSUSER_ROLE to ggate;
SQL> @ddl_enable.sql
sql>exit

$./ggsci


On the command line of goldengate type info all
It will show which processes are configured manager/Extract/Replicat

GGSCI > info all
 it will show manager as stopped

Edit Parameter file of Manager and put ( PORT 7809 ) in the file.
GGSCI >edit params mgr
PORT 7809
save and exit
Now lets start manager


GGSCI >start manager
GGSCI > info all
Now it will show Manager as running


Next step is to configure Replicat process


Now add the following lines to rep1 parameter file


--Replicat group --
replicat rep1
--source and target definitions
ASSUMETARGETDEFS
--target database login --
userid ggate, password ggate
--file for dicarded transaction --
discardfile /u01/goldengate/discard/rep1_discard.txt, append, megabytes 10
--ddl support
DDL
--Specify table mapping ---
map sender.*, target receiver.*;


Source Side

Now lets try to start extract ext1

GGSCI>start extract ext1
if there are any errors you will find the log in /u01/goldengate/dirrpt/EXT1.rpt
rectify them and start the extract process again.


GGSCI>info all


This time we see them running.


Destination Side

Now lets try to start replicat rep1
GGSCI>start manger
manager started


GGSCI>start replicat rep1sending start request to manager...
Replicat rep1 started


Testing


Sourec side
a) create a test table and insert 2 rows into it.


Destination Side

To overcome errors like
ERROR OGG-01223 TCP/IP error 110 (Connection timed out). 
and
ERROR OGG-01224 TCP/IP error 10061 (No connection could be made because the target machine actively refused it.)


Note: I had to Disable firewalls on both machines to let extract intercat with replicat for the time being.
The best solution is to open ports through iptables.


1. First look your listner is running or not
2. use Ping to check connection between machines
3. use tnsping connection between databases. check you have correct entries in tnsnames.ora
4. Try to connect to other database through sqlplus.

select * from test; --to see those rows have arrived


Thanks

Wednesday, August 8, 2012

How to resolve ORA-03135: connection lost contact?


When Oracle database clients, for example, PL/SQL developer, stay in idle state, after some time they'll be disconnected from Oracle database server. In such case oracle db server timed out the connection. While trying to re-run PL/SQL you'll get ORA-03135 error.
Workaround:
On the Oracle database server machine open file $ORACLE_HOME/network/admin/sqlnet.ora

Set parameter 
SQLNET.EXPIRE_TIME=XX

where XX specifies a time interval, in minutes, to send a check to verify that client/server connections are active.

Tuesday, August 7, 2012

ASMCMD command


ASMCMD is a command line interface utility that allows DBA to check and manipulate files and directories within Automatic Storage Management (ASM) disks. It can perform different tasks, including search, create and remove directories, display some useful information about space utilization, etc.
In this post we'll consider some examples of ASMCMD usage.
First of all, we should bring an ASM instance up.
[oracle@localhost ~]$ cat do_asm
export ORACLE_SID=+ASM
export ORACLE_BASE=/u01/app/oracle/product/11.1.0
export ORACLE_HOME=/u01/app/oracle/product/11.1.0/asm
[oracle@localhost ~]$ source ~/do_asm
[oracle@localhost ~]$ sqlplus / as sysdba
SQL*Plus: Release 11.1.0.6.0
Copyright (c) 1982, 2007, Oracle.  All rights reserved.
Connected to an idle instance.
SQL> startup mount
ASM instance started
Total System Global Area  284565504 bytes
Fixed Size                  1299428 bytes
Variable Size             258100252 bytes
ASM Cache                  25165824 bytes
ASM diskgroups mounted
SQL> exit
Further, we'll consider different types of asmcmd command usage.
1. Enter ASMCMD:
[oracle@localhost ~]$ asmcmd
ASMCMD>
2. To list files/diskgroups in the current directory:
ASMCMD> ls
DATA/
DG_RECOV/
the same, but using wildcard(s):
ASMCMD> ls /*/*
+DATA/MYASMDB/ARCHIVELOG/2011_09_10/:
thread_1_seq_10.303.761509543
thread_1_seq_11.308.761510355
thread_1_seq_12.313.761511001
thread_1_seq_4.270.761501055
thread_1_seq_5.277.761503847
thread_1_seq_6.284.761503927
thread_1_seq_7.293.761504137
thread_1_seq_8.294.761504141
thread_1_seq_9.298.761507015
Current.260.760123743
Current.261.760123739
SYSAUX.257.760123487
SYSTEM.256.760123483
TEMP.268.760123809
UNDOTBS1.258.760123489
USERS.259.760123489
group_1.262.760123749
group_1.263.760123751
group_2.264.760123759
group_2.265.760123761
group_3.266.760123763
group_3.267.760123763
spfile.269.760123983
ASMCMD>
3. To navigate ASM directory:
ASMCMD> cd DATA/
ASMCMD> cd ..
4. To see the path of the current ASM directory:
ASMCMD> pwd
+DATA/MYASMDB
5. To create ASM directories:
ASMCMD> ls
MYASMDB/
STANDBY1/
ASMCMD> mkdir MyTest1
ASMCMD> ls
MYASMDB/
MyTest1/
STANDBY1/
ASMCMD>
6. The directories names are case insensitive:
ASMCMD> cd MYT*
ASMCMD> pwd
+DATA/MyTest1
ASMCMD>
7. To remove ASM directory:
ASMCMD> rm MYTEST1
ASMCMD> ls
MYASMDB/
STANDBY1/
ASMCMD>
8. List files and display their size and some extended information:
ASMCMD> ls -ls
Type      Redund  Striped  Time             Sys  Block_Size  Blocks      Bytes      Space  Name
DATAFILE  UNPROT  COARSE   SEP 10 18:00:00  Y          8192   73337  600776704  601882624  SYSAUX.257.760123487
DATAFILE  UNPROT  COARSE   SEP 10 18:00:00  Y          8192   88321  723525632  725614592  SYSTEM.256.760123483
DATAFILE  UNPROT  COARSE   SEP 10 18:00:00  Y          8192    5121   41951232   42991616  UNDOTBS1.258.760123489
DATAFILE  UNPROT  COARSE   SEP 10 18:00:00  Y          8192     641    5251072    6291456  USERS.259.760123489
9. Search the specified directory and all subdirectories in the ASM directory tree for the supplied name:
ASMCMD> find +DATA control*
+DATA/MYASMDB/CONTROLFILE/
+DATA/STANDBY1/CONTROLFILE/
ASMCMD>
ASMCMD> find -t CONTROLFILE +data *
+data/MYASMDB/CONTROLFILE/Current.260.760123743
+data/MYASMDB/CONTROLFILE/Current.261.760123739
+data/STANDBY1/CONTROLFILE/cf1
+data/STANDBY1/CONTROLFILE/current.271.761503123
+data/STANDBY1/CONTROLFILE/current.272.761503687
ASMCMD>
The -t flag tells to search for particular type of file(s), for example, CONTROLFILE.
The values for -t flag can be found in the type column of the V$ASM_FILE dictionary view.
10. Copy within ASM directory tree:
ASMCMD> ls
ARCHIVELOG/
CONTROLFILE/
DATAFILE/
ONLINELOG/
PARAMETERFILE/
TEMPFILE/
spfilemyasmdb.ora
ASMCMD> pwd
+DATA/MYASMDB
ASMCMD> cp +DATA/MYASMDB/spfilemyasmdb.ora +DATA/MYASMDB/copy_spfilemyasmdb.ora
source +DATA/MYASMDB/spfilemyasmdb.ora
target +DATA/MYASMDB/copy_spfilemyasmdb.ora
copying file(s)...
file, +DATA/myasmdb/copy_spfilemyasmdb.ora, copy committed.
ASMCMD> ls
ARCHIVELOG/
CONTROLFILE/
DATAFILE/
ONLINELOG/
PARAMETERFILE/
TEMPFILE/
copy_spfilemyasmdb.ora
spfilemyasmdb.ora
ASMCMD>
11. External copy, from ASM to OS filesystem:
ASMCMD>  cp +DATA/MYASMDB/spfilemyasmdb.ora /u01/app/oracle/product/11.1.0/asm/dbs/os_copy_spfilemyasmdb.ora
source +DATA/MYASMDB/spfilemyasmdb.ora
target /u01/app/oracle/product/11.1.0/asm/dbs/os_copy_spfilemyasmdb.ora
copying file(s)...
file, /u01/app/oracle/product/11.1.0/asm/dbs/os_copy_spfilemyasmdb.ora, copy committed.
ASMCMD> exit
[oracle@localhost ~]$ ll /u01/app/oracle/product/11.1.0/asm/dbs/os_copy_spfilemyasmdb.ora
-rw-r----- 1 oracle oinstall 3584 Mon dd hh:mm /u01/app/oracle/product/11.1.0/asm/dbs/os_copy_spfilemyasmdb.ora
[oracle@localhost ~]$
12. The opposite way, copy from OS filesystem to ASM will not work:
ASMCMD> cp /u01/app/oracle/product/11.1.0/asm/dbs/os_copy_spfilemyasmdb.ora +DATA/MYASMDB/asm_copy_spfilemyasmdb.ora
source /u01/app/oracle/product/11.1.0/asm/dbs/os_copy_spfilemyasmdb.ora
target +DATA/MYASMDB/asm_copy_spfilemyasmdb.ora
ASMCMD-08012: can not determine file type for file->'/u01/app/oracle/product/11.1.0/asm/dbs/os_copy_spfilemyasmdb.ora'
ORA-15056: additional error message
ORA-19762: invalid file type DGGetFileAttr20
ORA-06512: at "SYS.X$DBMS_DISKGROUP", line 207
ORA-06512: at line 3 (DBD ERROR: OCIStmtExecute)
ASMCMD>

Oracle impdp via database link


Oracle impdp via database link

Example:

create user XXX
identified by "YYY"
default tablespace ZZZ_TBS
temporary tablespace TEMP
profile DEFAULT;

grant execute on DBMS_FLASHBACK to XXX
grant read, write on directory DATA_PUMP_DIR to XXX, system;
grant connect to XXX;
grant resource to XXX;
grant create any materialized view to XXX;
grant create any view to XXX;
grant create materialized view to XXX;
grant unlimited tablespace to XXX;
grant create any table to XXX;
grant create any sequence to XXX;
grant create any trigger to XXX;
grant create any type to XXX;

create public database link old_data_source connect to old_xxx identified by old_yyy using '(DESCRIPTION = (ADDRESS_LIST = (ADDRESS = (PROTOCOL = TCP)(HOST = A.B.C.D)(PORT = 1521))) (CONNECT_DATA = (SERVICE_NAME = my_service)))';

select * from old_xxx.some_table@old_data_source

impdp xxx/yyy DIRECTORY=data_pump_dir NETWORK_LINK=old_data_source remap_schema=old_xxx:xxx

Creating Oracle database with ASM storage mechanism using dbca


Creating Oracle database with ASM using Oracle database configuration assistant (dbca).
1. Run dbca:
./dbca
2. Until step 6 leave the default choices and press the “Next” button.
3. Database Configuration Assistant, Step 6 of 16: Storage Options.
Select the Automatic Storage Management (ASM) mechanism for the database you’re creating:
Creating Oracle database with ASM storage mechanism using dbca
4. At the step 7 select ASM disk groups you’d like to use as storage for the database you’re creating.
This dialog allows you to create new asm disk groups or add disks to an existing disk group.
We’re using external redundancy, because our asm files are placed on a storage with RAID 5 / RAID 10 redundancy mechanism implemented.
Creating Oracle database with ASM storage mechanism using dbca
5. Next step select database file locations.
Choose the ASM disk group for the database files to be created.
Creating Oracle database with ASM storage mechanism using dbca  Creating Oracle database with ASM storage mechanism using dbca
6. Specify recovery options for the database.
For production databases both options are obligatory.
For example, you can place flash recovery area on +FLASHBACK ASM diskgroup and archivelogs on +ARCHIVELOG ASM diskgroup.
Creating Oracle database with ASM storage mechanism using dbca
7. The next few steps are straightforward. Just set desirable memory_max_target/sga_target, character set, security defaults for your database to be created.
8. Finally your database will be created in 10-20 minutes.
Creating Oracle database with ASM storage mechanism using dbca
9. Connect to the database and run some queries to verify everything is Ok.
[oracle@london ~]$ sqlplus / as sysdba
SQL*Plus: Release 11.1.0.6.0 -
Copyright (c) 1982, 2007, Oracle.  All rights reserved.
Connected to:
Oracle Database 11g Enterprise Edition Release 11.1.0.6.0 - Production
With the Partitioning, OLAP, Data Mining and Real Application Testing options
SQL> select instance_name, status from v$instance;
INSTANCE_NAME    STATUS
---------------- ------------
london           OPEN
SQL> set lines 1200
SQL> select file_name, tablespace_name, bytes, status from dba_data_files;
FILE_NAME                                                                                                                        TABLESPACE_NAME                      BYTES STATUS
--------------------------------------------------------------------------------------------------------------------------------------------------------------------------------------------------------------------------------------------------------------------------------------------------------------------------------------------------------------------------------------------------------------------------------------------------------------------------------------------------------------------------------- ------------------------------ ---------- ---------
+DATA/london/datafile/users.259.762604973                                                                                        USERS                      5242880 AVAILABLE
+DATA/london/datafile/undotbs1.258.762604973                                                                                     UNDOTBS1                          78643200 AVAILABLE
+DATA/london/datafile/sysaux.257.762604973                                                                                       SYSAUX                   614203392 AVAILABLE
+DATA/london/datafile/system.256.762604971                                                                                       SYSTEM                   723517440 AVAILABLE
SQL>
SQL> select * from v$logfile;
    GROUP# STATUS  TYPE    MEMBER                                                                                                   IS_
---------- ------- ------- --------------------------------------------------------------------------------------------------------------------------------------------------------------------------------------------------------------------------------------------------------------------------------------------------------------------------------------------------------------------------------------------------------------------------------------------------------------------------------------------------------------------------------- ---
         3         ONLINE  +DATA/london/onlinelog/group_3.266.762605165                                                             NO
         3         ONLINE  +DATA/london/onlinelog/group_3.267.762605167                                                             YES
         2         ONLINE  +DATA/london/onlinelog/group_2.264.762605159                                                             NO
         2         ONLINE  +DATA/london/onlinelog/group_2.265.762605163                                                             YES
         1         ONLINE  +DATA/london/onlinelog/group_1.262.762605155                                                             NO
         1         ONLINE  +DATA/london/onlinelog/group_1.263.762605157                                                             YES
6 rows selected.
SQL> create table TESTTABLE (a number(10), b number(20)) tablespace TESTTB;
Table created.
SQL> insert into TESTTABLE values(10, 12);
1 row created.
SQL> commit;
SQL>  select TABLE_NAME, TABLESPACE_NAME from dba_tables where table_name like '%TESTT%';
TABLE_NAME                     TABLESPACE_NAME
------------------------------ ------------------------------
TESTTABLE                      TESTTB
SQL>
[oracle@london ~]$ cat .do_asm
ORACLE_BASE=/u01/app/oracle/product/11.1.0
ORACLE_HOME=$ORACLE_BASE/asm
ORACLE_SID=+ASM
LD_LIBRARY_PATH=$ORACLE_HOME/lib
PATH=$PATH:$ORACLE_HOME/bin
export ORACLE_BASE ORACLE_HOME ORACLE_SID LD_LIBRARY_PATH PATH
[oracle@london ~]$ . .do_asm
[oracle@london ~]$ asmcmd
ASMCMD> ls
ARCHLOG/
DATA/
REDOLOGS/
ASMCMD> ls ./*/*/*
+DATA/LONDON/CONTROLFILE/:
Current.260.762605153
Current.261.762605153
+DATA/LONDON/DATAFILE/:
SYSAUX.257.762604973
SYSTEM.256.762604971
TESTTB.269.762606991
UNDOTBS1.258.762604973
USERS.259.762604973
+DATA/LONDON/ONLINELOG/:
group_1.262.762605155
group_1.263.762605157
group_2.264.762605159
group_2.265.762605163
group_3.266.762605165
group_3.267.762605167
+ARCHLOG/LONDON/PARAMETERFILE/:
spfile.256.762605605
+DATA/LONDON/TEMPFILE/:
TEMP.268.762605203
spfilelondon.ora
ASMCMD>

Linux. How to mount a new filesystem?


1. Edit /etc/fstab. Add a line similar to the last one:
[root@localhost ~]# cat /etc/fstab
/dev/VolGroup00/LogVol00 /                       ext3    defaults        1 1
LABEL=/boot             /boot                   ext3    defaults        1 2
tmpfs                   /dev/shm                tmpfs   defaults        0 0
devpts                  /dev/pts                devpts  gid=5,mode=620  0 0
sysfs                   /sys                    sysfs   defaults        0 0
proc                    /proc                   proc    defaults        0 0
/dev/VolGroup00/LogVol01 swap                    swap    defaults        0 0
shmfs                   /dev/shm                tmpfs   size=2g         0 0
/dev/sdb1               /u02                    ext3    defaults        1 2
[root@localhost ~]#
2. Mount the filesystem:
[root@localhost ~]# mount /u02
3. Verify that it is available:
[root@localhost ~]# df -h /u02
Filesystem            Size  Used Avail Use% Mounted on
/dev/sdb1              30G  173M   28G   1% /u02
[root@localhost ~]#